
Ever since Aina was little, we like to tell her stories about animals. All kinds of animals in the forest, the farm, under the sea and all around us here in urban Singapore. We tell Aina what these animals like to eat, what kind of sounds they make, how they move... and since it's obvious she really likes these animal story sessions, we thought role-playing might be an interesting way for her to express herself as well.
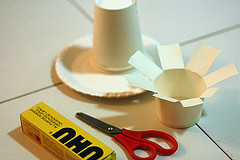
So one day, we decided to make some quick and easy animal masks out of common house-hold materials found in the kitchen. Paper plates and cups, glue, scissors, thin elastic band (or rubber bands), coloring markers, and acrylic (or poster) paint. We used paper plates and cups for these masks, because they are coated with wax and won't become soggy from sweat during energetic role-plays.
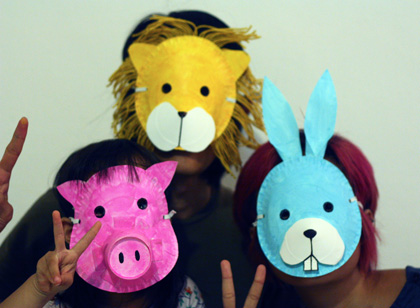
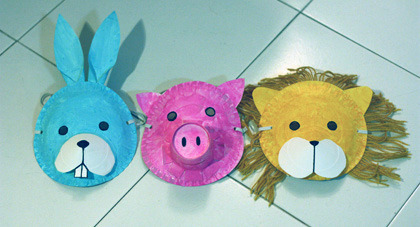
The Pink Piggy
Out of the tree that we made, it was the easiest to make and also happened to be Aina's favorite. Basically, it's a paper plate with a shortened paper cup glued to it to form the snout. First, we cut the edge of the paper cup to shorten it, then in a radiating pattern so that it can easily glued to the plate. Then, cut the eye holes carefully with sharp scissors. Make sure that they are aligned with the kid’s eyes.
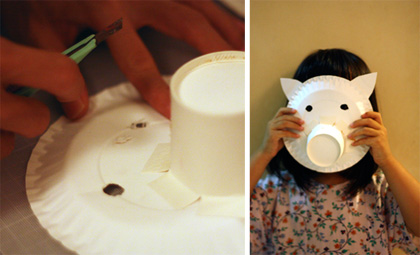
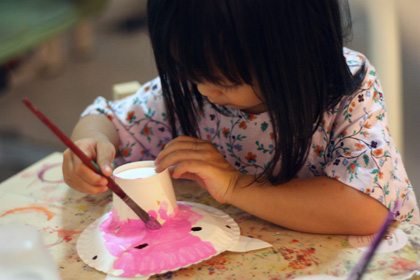
Then, we added ears — you can use an extra plate for this or the leftover pieces from the paper cup. We made two holes on each side of the mask for attaching the rubber band or elastic band. Lastly, we let Aina paint the mask pink with the acrylic paint.
The Blue Bunny
This one was pretty similar to the Piggy mask, except that instead of a paper cup, we used another paper plate for the snout. A pizza pie shape was cut out of the second paper plate, so that the remaining portion can be bent to form a shallow cone. Then cut the base of the cone to form the bunny's cheeks and two buck-teeth before gluing it to the face plate.
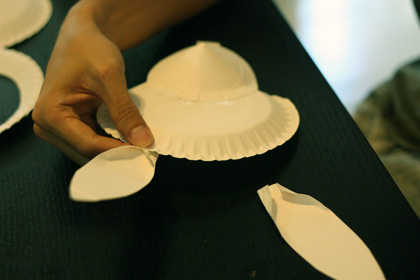
To make the ears, we trimmed the pizza pie shape that was cut earlier out of the second plate, and glued them to the face plate. We told Aina that she could paint this one blue, but leave the snout white.

After the paint dries, I drew the bunny nose and teeth with black marker.
The Yellow Lion
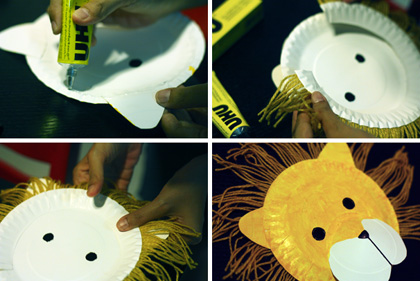
The hardest to make out of the three, we used yellow knitting yarn for the Lion's mane. We glued the yarn down (in loops) to a 2cm thick outer rim, cut out of a paper plate.
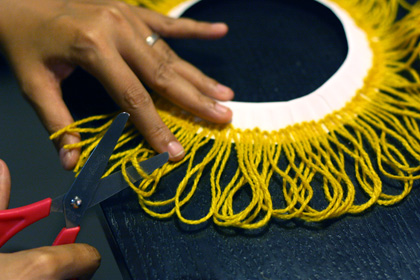
This is to prevent the glued yarns from sticking to the kid's forehead when wearing the mask. Ears were attached to the back of a second paper plate. Using a third paper plate, we created a snout similar to the bunny mask - this time without the buck-teeth. We painted the Lion yellow and drew the Lion's face with markers, since Aina was already busy 'oink'ing away with the piggy mask at this point. Finally, after cutting the loops off the yarn, we glued the hair piece to the back of the face plate so that the yarn is sandwiched between the two plates.
You can try to make other animal masks by modifying the shape of the snout and ears. Don't be afraid to experiment, and have fun!


Woaa telat bacanya, keren banget! kalo bikin kodok tapi gimana yah..
udah baca di blognya Thalia nih, emang kreatif ya keluarga kalian, inspiring deh... itu Aina keliatan telaten banget ya ngelukisin topengnya.. hebaat..
Thanks buat semuanya yang nulis komen positif yah. Moga2 bisa ngasih ide buat bikin2 DIY masks yang mendukung imajinasi si kecil. Tapi yang lebih penting: having fun waktu bikinnya :)
Ari, Thalia, Aina... Kereeeeeeeeeeeeeeeeen!
asli, kreatif+keren bgt...harus coba bikin nih...thanx 4 inspiring...